Until now, you could only add live production websites to your mySites.guru account, this blog post will introduce a new way you can now test a Joomla or WordPress site installed on your local computer, or behind a corporate firewall and inaccessible normally to the internet.

Introducing Ngrok – a small utility to give your local sites a public address
In order to connect your local sites, or sites behind a firewall, we are going to introduce Ngrok – you can read all about its powerful options on their website https://ngrok.com It does way more than we are going to cover here, and has free and paid for options depending on the features you want.
You can use the free level (or any paid level) of Ngrok to connect your sites to mySites.guru, however if you are using the free level then, for the time you have the tunnel open, your “private” local/firewalled sites will be publicly accessible on a random url. If you have a Business Plan at ngrok you can limit access to your site by our IP addresses.
Why would you want to do this?
Several examples:
- During development you might want to audit your site on your local computer quickly
- During fixing a hack, you might want to audit the security of the content of the files on a hacked site, hosted locally, before you are sure the hack has been removed
- Auditing and connecting an intranet or server behind a corporate firewall or NAT not normally accessible to the internet.
What is ngrok?
From their website:
ngrok exposes local servers behind NATs and firewalls to the public internet over secure tunnels.
https://ngrok.com/product
Alternatives to ngrok
There are some other ngrok-like tools, which we will not cover here, but some are gaining much attention recently, even though they are less mature and less feature-rich than Ngrok. The one I like most is Expose, as its written in PHP. The concept is the same.
The Concept
The concept with Ngrok, is that you download and install ngrok, and you run a command line, this creates a tunnel to your local computer and sets up a reverse proxy to a public URL that ngrok will give you.
The ngrok application will even give you a fully validated SSL url so that your local non-ssl site can now be accessed on a SSL based Url!
In simple terms, you will provide mySites.guru with this disposable url from ngrok, and when we access it, we will see your local website on your local computer as if it were a real live website on the internet. Simple!
Note: The principle is making something not normally available on the internet, something secured away from the internet, now publicly accessible to anyone with the known url. Be sure you are comfortable with that fact. Anyone with the ngrok random url can access your site while the tunnel is up and running. No one will be able to access your site once the tunnel is stopped.
Lets get started!
Ok first you need to signup (for free, or paid account) download and install ngrok – this varies depending on your operating system but is all documented on their site.
Once you have installed ngrok, you can authenticate ngrok using the command
ngrok authtoken <YOUR_AUTH_TOKEN>You can find your auth token in your ngrok account. Its actually displayed and can be copy and pasted from this page https://dashboard.ngrok.com/get-started/setup after login.
The next (and last step here) is to start a tunnel pointing at your local web server. Lets assume than right now you access your local site on
Home
then the ngrok command would be:
ngrok http 80If your local website was on a special port, like 8080 then just change the 80 to 8080.
If your local website uses a name like https://myhackedsite.localmachine:8081/ then the ngrok command would be:
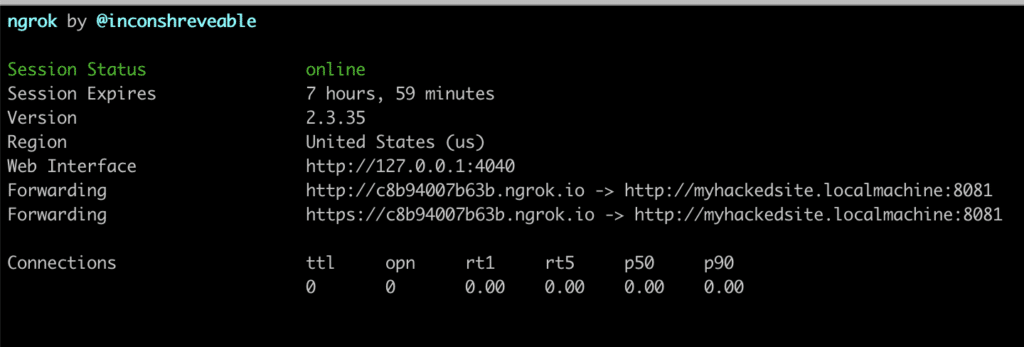
ngrok http https://myhackedsite.localmachine:8081if you have done everything right you should see something like this:

You can now open a browser to the ngrok.io urls provided and see your website live on the internet!
In the example screenshot above https://c8b94007b63b.ngrok.io is the url I would use.
Connecting the site to mySites.guru
The rest is pretty simple. Just take that secure https url provided by ngrok and connect your site to mySites.guru the same way you would any other site using the “Add another site” button on the sites page in your mySites.guru account.
Note: You need an unlimited sites subscription to connect ngrok urls to mySites.guru – we do not allow free trial accounts, disposable accounts, or one-site-only accounts to use ngrok urls to prevent fraud and abuse.
To terminate the tunnel after you have finished you can press CTRL and C when the terminal is active. Note that each time you start a tunnel the random url WILL CHANGE, if you want to prevent this you can upgrade to a paid plan at ngrok and have a custom reserved domain.
If using WordPress and having problems, you can see this gotcha in the docs.
Conclusion
Ngrok (or expose) are great tools for any professional web developer or agency to have at their fingertips to solve problems.
Ngrok exposes your otherwise inaccessible services to the internet using tunnels that allow us to connect to your site as if it were a live website.
Ngrok is much more powerful than this blog post explains – be sure to find out more on their site, upgrade to a paid plan, and enjoy (We are not being paid to say this, we use ngrok ourselves and are happy to recommend it).
Last updated on January 5th, 2025