How to Access Your mySites.guru Account Using our Secure API
Last week we introduced the mySites.guru MCP server, which lets you manage your whole WordPress and Joomla estate by talking to an AI client like Claude. A lot of you asked the obvious follow-up question: what is underneath it, and can I use that directly from my own code?
The answer is yes. Underneath the MCP server is the mySites.guru Agency API, a secure REST API that does everything the MCP server does, and it is the foundation we built the MCP server on top of. This post explains what the API is, how you connect to it securely, and why “secure by design” is a claim we can actually back up rather than a line on a marketing page.
If you have ever wanted to pull your site list into your own dashboard, fire off audits from a cron job, or trigger a round of extension updates from a deploy script, this is the tool for that.
The set of endpoints available today is deliberately small. We have shipped a focused starting point, we are watching usage and listening to feedback, and we will grow it from there. Treat what follows as the ground floor, not the finished feature.
The short version
The mySites.guru Agency API is a REST API that exposes the same actions you take in the dashboard, including listing sites, reading audits and backups, and triggering audits, backups, snapshots and updates. It uses OAuth2 with PKCE, no static keys, with short-lived tokens scoped to your own sites. It is the same engine the MCP server runs on, so you can use the API on its own, the MCP server on its own, or both together.
The API, the MCP server, and how they relate
Worth being clear about this up front, because it shapes everything else.
The Agency API is the engine. It is a plain REST API: your code sends an HTTP request with a token, the API does the work and sends JSON back. The MCP server we launched last week is a second front door bolted onto that same engine, designed so an AI client can drive it in natural language. Both share the same authentication, the same per-user scoping, and the same underlying actions. The MCP server is, in effect, a thin translation layer that turns “back up all my Joomla sites” from an AI client into the same operations the API exposes directly.
That gives you three ways to use mySites.guru programmatically:
- The API instead of the MCP server. Write a script, a dashboard, or a scheduled job that talks straight to the REST API. No AI client involved.
- The API alongside the MCP server. Use Claude for ad-hoc, conversational work, and a scripted API integration for the repeatable, scheduled jobs. They share the same account and the same permissions model.
- The API as a standalone service. Wire mySites.guru into your own agency dashboard, a status page, or an internal tool, with no dependency on any AI tooling at all.
Pick whichever fits the job. Nothing about the API requires you to use the MCP server, and nothing about the MCP server is doing anything the API could not.
What the API can do
The API exposes the same actions you already perform by hand in the dashboard, split into reading data and triggering work.
Reading data:
- Your account profile and plan details
- Your full list of sites, with platform, version, PHP version and connection status, filterable by platform or tag
- A single site’s full detail
- Audit results for a site, and the full detail of any individual audit
- A site’s backups and their status
- A site’s snapshots
- The extensions installed on a site
- The tags across your account
Triggering work:
- Start a new audit on a site
- Start a new backup
- Take a new snapshot
- Trigger extension updates
The triggering endpoints return immediately and run the job in the background, exactly as they do when you click the button in the dashboard. You get a confirmation that the job was queued, not a response that blocks until a backup finishes.
The important principle is that the API never grants more than you already have. Every action maps to something your account can already do. If you cannot see a site in the dashboard, no token issued to you can reach it through the API either.
How you connect: OAuth2 with PKCE
This is the part that earns the “secure” in the title, so it is worth walking through properly. If OAuth flows make your eyes glaze over, the headline is: no passwords leave your app, nothing long-lived is sitting around to be stolen, and you approve each connection yourself.
The API uses the OAuth2 Authorization Code flow with PKCE, and that is the only supported method. There are no static API keys to leak, no basic-auth passwords sitting in a config file, and no long-lived bearer tokens that work forever if they escape. If you have integrated with Google, GitHub or a bank’s API, the shape of this will be familiar.
Step 1: Register an API client
In your dashboard, go to Account then API Clients and create a new client. You receive a client_id. There is deliberately no client_secret, because PKCE replaces it. You add the redirect URI (or URIs) your application will use, and you are done.
Step 2: Generate a PKCE pair
Before sending the user off to authorize, your application generates a one-time secret called a code verifier, and a hashed version of it called a code challenge:
// Browser example using the Web Crypto API
const verifier = base64url(crypto.getRandomValues(new Uint8Array(32)));
const challenge = base64url(
  await crypto.subtle.digest('SHA-256', new TextEncoder().encode(verifier))
);
You keep the verifier private and send only the challenge in the next step. This is what stops an intercepted authorization code from being useful to anyone but you.
Step 3: Send the user to authorize
Your application redirects the user to the authorization endpoint, asking for exactly the scopes it needs:
GET https://manage.mysites.guru/oauth/authorize
  ?response_type=code
  &client_id=YOUR_CLIENT_ID
  &redirect_uri=https://yourapp.example.com/callback
  &scope=api:profile:read api:sites:read
  &code_challenge=BASE64URL_SHA256_OF_VERIFIER
  &code_challenge_method=S256
  &state=RANDOM_NONCE
The user lands on a mySites.guru consent screen, signs in if they are not already, and sees exactly which permissions your application is asking for. Your application never sees their password. If they approve, they are sent back to your redirect URI with a short-lived authorization code.

Step 4: Exchange the code for tokens
Your application swaps the code, plus the original verifier, for tokens:
POST https://manage.mysites.guru/oauth/token
Content-Type: application/x-www-form-urlencoded

grant_type=authorization_code
&code=AUTH_CODE_FROM_CALLBACK
&redirect_uri=https://yourapp.example.com/callback
&client_id=YOUR_CLIENT_ID
&code_verifier=YOUR_ORIGINAL_VERIFIER
You get back an access token and a refresh token:
{
  "token_type": "Bearer",
  "expires_in": 3600,
  "access_token": "eyJ...",
  "refresh_token": "def502..."
}
Step 5: Call the API
From here, every request carries the access token:
GET https://manage.mysites.guru/api/v1/sites
Authorization: Bearer eyJ...
And a response comes back as JSON:
{
"data": [
{
"hash_id": "aB3xY9",
"url": "https://acme.example.com",
"friendly_name": "Acme Corp",
"platform": "Joomla",
"version": "5.2.1",
"php_version": "8.3.4",
"db_version": "8.0.36",
"tags": [
{ "slug": "client", "name": "Client", "color": "#3b82f6" }
],
"is_connected": true,
"last_audit": "2026-06-06T18:54:25+00:00",
"last_backup": "2026-06-06T02:00:00+00:00"
}
],
"meta": { "current_page": 1, "per_page": 25, "total": 87 }
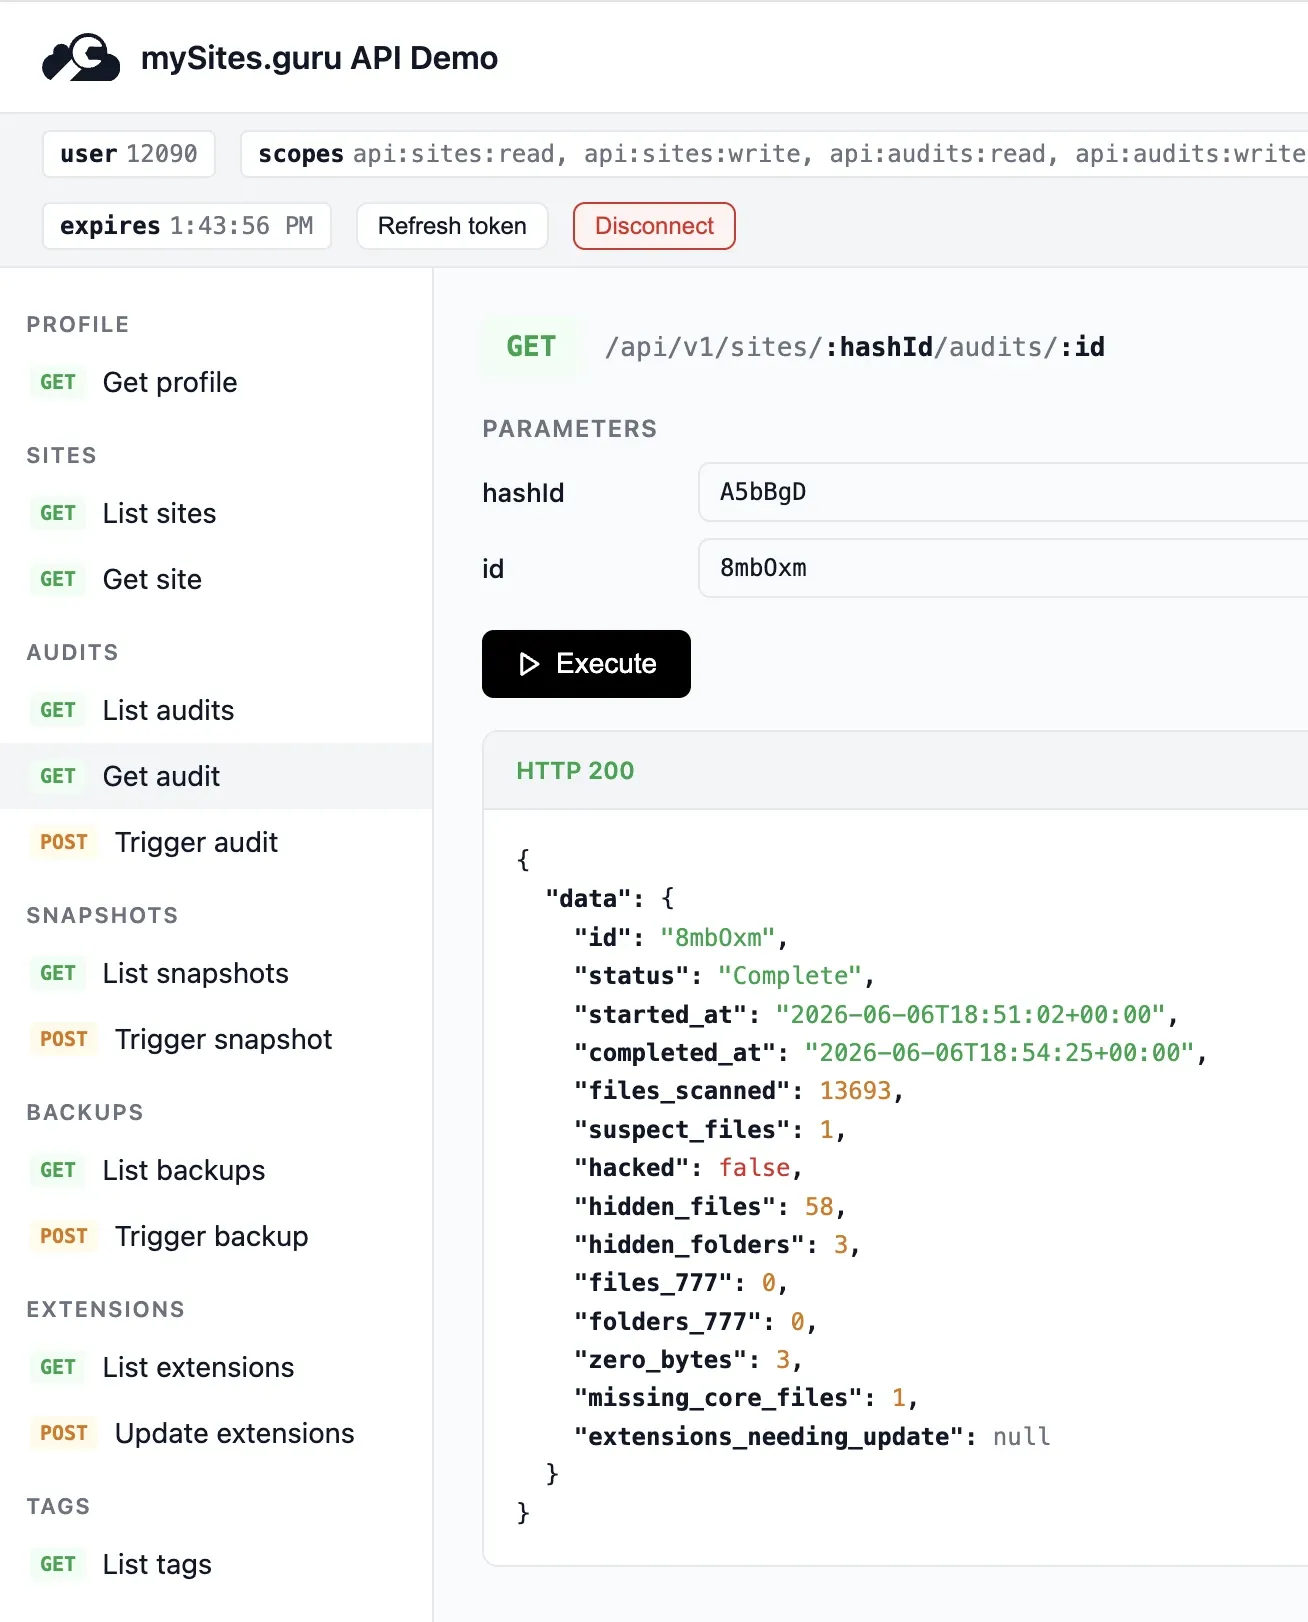
}The interactive demo bundled with the API does exactly this against your own account. Here it is calling GET /api/v1/sites/{hashId}/audits/{id} and getting a real audit back: files scanned, suspect files, hidden files, missing core files, and the hacked flag, all from one signed request.
Step 6: Refresh when the token expires
Access tokens last one hour. When one expires, your application uses the refresh token (valid for one month) to get a new pair, without sending the user through the consent screen again:
POST https://manage.mysites.guru/oauth/token
Content-Type: application/x-www-form-urlencoded

grant_type=refresh_token
&refresh_token=def502...
&client_id=YOUR_CLIENT_ID
The old refresh token is invalidated and you receive a fresh pair. Short-lived access tokens with rotating refresh tokens mean that even in the worst case, an exposed access token is useful for at most an hour.
Why “secure by design” is more than a slogan
Security here is not a feature bolted on afterwards. It falls out of how the API is built. Here is what that actually means in practice.
No static secrets
Because the only supported flow is Authorization Code with PKCE, there is no permanent API key that grants access forever. The thing your application holds long term is a refresh token tied to a specific user’s approval, and even that expires. There is no shared secret to find in a leaked .env file and replay.
Tokens are scoped to your own sites, and re-checked every time
When a token is issued, the permissions are resolved for that specific user. On every single request to a site-specific endpoint, the API independently confirms that the site belongs to the user’s company, and, if the user is a restricted team member, that the site is one they are allowed to see. A token cannot reach a site its owner could not already reach in the dashboard. This check is not done once at login and trusted thereafter, it runs on each request.
Scopes mean least privilege
Your application asks only for the scopes it needs, such as api:sites:read on its own, or api:audits:write to trigger audits. The consent screen shows the user exactly what they are granting before they approve. A read-only reporting dashboard never needs to ask for write access, and a user can see that it has not.
Short-lived tokens and per-user resolution
Access tokens expire after an hour. Permissions are tied to the user who approved the connection, not baked into a shared client, so the same integration approved by two different people gets each person’s own access and never leaks one user’s reach to another.
HTTPS only, rate limited, revocable
Redirect URIs must be HTTPS (the only exception is localhost, for local development). The API is rate limited per token, so a runaway script is contained rather than allowed to hammer the platform. And every client you create is listed in your dashboard under Account then API Clients, where you can revoke any of them in one click. Revoking a client cuts off its access.
This is the same security model we described for the MCP server, for the simple reason that they share it. The MCP server is secure for the same reasons the API is: it is the same OAuth2 layer underneath.
A worked example: a nightly audit report
To make this concrete, picture the kind of thing the API is built for. You run an agency with 80 client sites and you want a single email each morning summarising any site whose audit score dropped overnight.
With the API, that is a small scheduled script:
- Refresh your access token if it has expired.
- Call
GET /api/v1/sitesto get your site list. - For each site, call
GET /api/v1/sites/{hashId}/auditsand read the most recent score. - Compare against yesterday’s stored scores and assemble the ones that fell.
- Email yourself the list.
No browser, no clicking through 80 dashboards, no AI client in the loop. Just your own code, running on your own schedule, talking to a secure API. If you would rather ask the same question conversationally now and then, the MCP server answers “which of my sites dropped an audit score last night?” from an AI client, using this exact same data.
For agencies already leaning on scheduled audits, updates and backups inside mySites.guru, the API is the natural next step when you want that automation wired into your own systems rather than ours.
What the API does not do (yet)
Being honest about the edges is part of being secure and trustworthy.
The API currently covers reading and triggering the core operations listed above. It does not yet offer webhooks or event subscriptions, so you poll for changes rather than being pushed them. The full developer reference documentation is being finalised and is not published yet, so for now the entry point is the Account then API Clients screen in your dashboard, and the flow described in this post. When the reference docs go live we will link them here.
If there is an operation you can do in the dashboard that you want exposed through the API, tell us. The API deliberately mirrors the dashboard, so the roadmap for it is driven by what you actually want to automate.
Getting started
- Sign in to your mySites.guru dashboard.
- Go to Account then API Clients and create a client.
- Note your
client_idand add your redirect URI. - Run the Authorization Code with PKCE flow described above against the
/oauth/authorizeand/oauth/tokenendpoints. - Call
https://manage.mysites.guru/api/v1/with your Bearer token.
If you are not yet a mySites.guru subscriber, you can start with a free audit or see everything the platform does first. The API, like the MCP server, is there to let you bend mySites.guru around your own workflow rather than the other way around.
Further Reading
- Manage Every Site From Claude Desktop or other AI tools - the MCP server built on top of this API
- Schedule your security audits, updates and backups - the built-in scheduling the API complements
- How to mass upgrade Joomla and WordPress sites from one dashboard - the bulk update workflow, available to trigger via the API
- Manage multiple sites with your whole team - the team permissions model the API scoping respects
- OAuth 2.0 Authorization Framework (RFC 6749) - the standard the API is built on
- Proof Key for Code Exchange (RFC 7636) - the PKCE extension that removes the need for a client secret
Want to manage your sites without writing a line of code? The mySites.guru MCP server runs on this same API and lets you do it all in plain language from an AI client.