Quick Add Sites to mySites.guru From WHM/cPanel
The usual way to add a site to mySites.guru is the connect wizard: download the connector zip, open the site’s own installer, upload it, come back and finish. Fine for one site. On a reseller server with 40 sites it is 40 zips, 40 installers and an afternoon gone. There is now a shorter route, in Beta: connect your WHM server or cPanel account once with a limited API token, and mySites.guru finds every Joomla and WordPress site on it.
Tick the sites you want, press Connect, and the connector is installed for you without a single download to your machine. The same connection gives Manage Site a cPanel tab, with the NGINX cache, the PHP version and php.ini a click away. And for a site on a host you do not control, there is a second shortcut at the end of this post: type its admin login once and mySites.guru does the connecting for you.
Import Every Joomla and WordPress Site on a WHM Server
The import runs from the Add Site page, and the whole thing is six steps, most of them done for you.
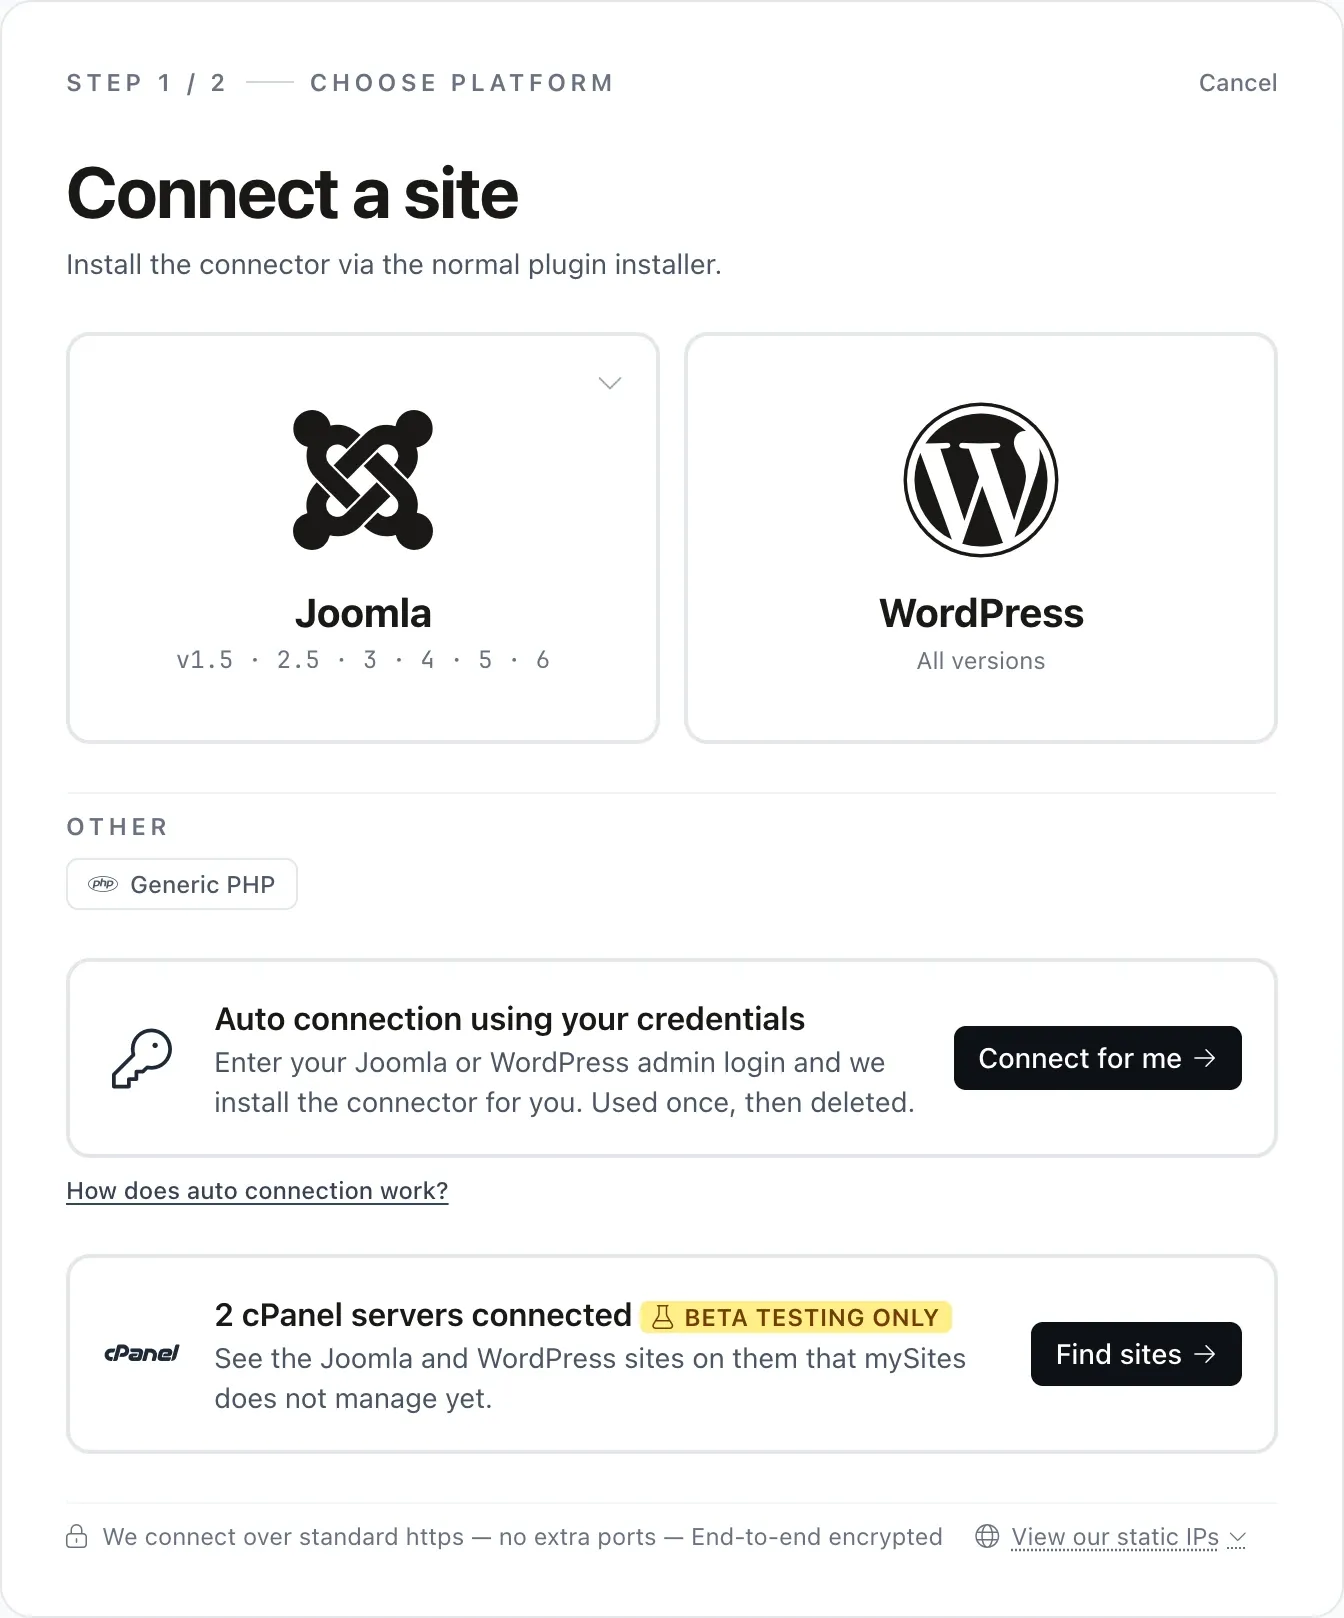
Open Add Site and look under Other for the strip that reads "Sites on a cPanel or WHM server?", then press Import from cPanel. Once a server is connected, the same strip reads Find sites.
Create an API token in WHM, or in cPanel if you only have the one account.
The Connect dialog lists the privileges to tick and the steps to follow, so you do not need to remember them.
Paste the host, the username and the token into the dialog.
mySites.guru reads the accounts on the server, with a "Reading accounts" counter showing how far it has got, then runs Discover on each one by itself.
Tick the sites you want to add.
Press Connect.
Up to 50 sites per Connect, and one site is connected every 30 seconds per server, so the server does not get hit all at once.
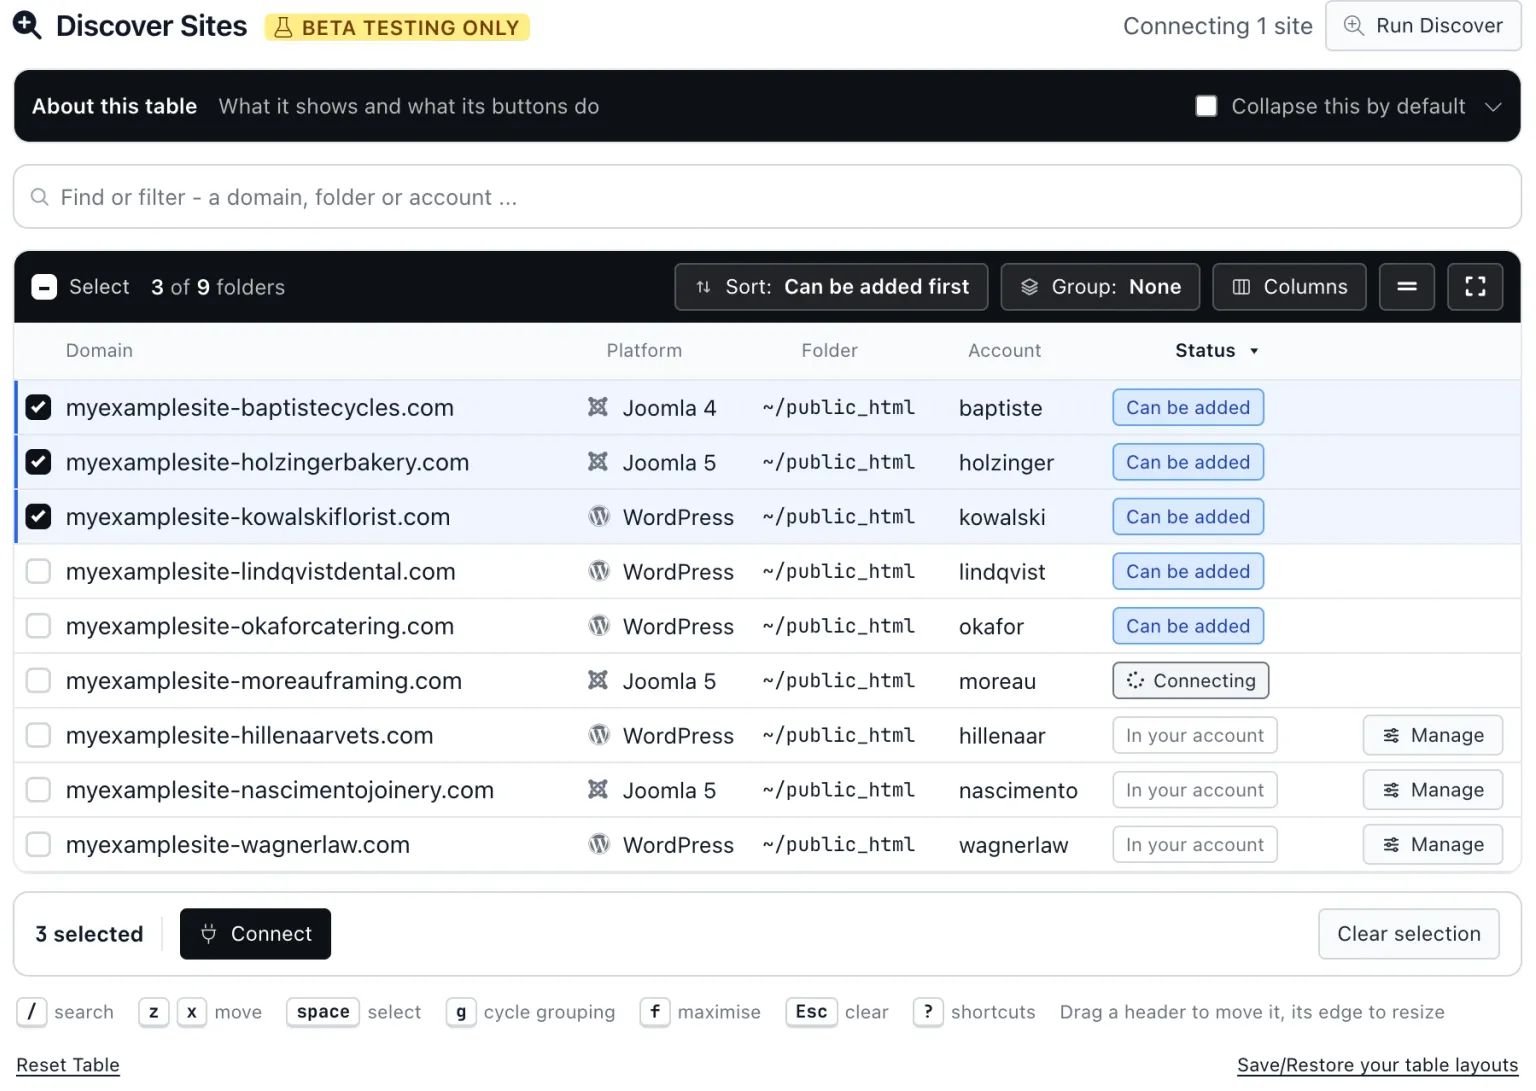
Discover looks for two file patterns in each account. A configuration.php next to an administrator/ folder is a Joomla site; a wp-config.php next to a wp-includes/ folder is a WordPress site. It checks only that the files exist. It does not open them, so the database password in each one stays on the server.
Each folder it finds gets a state in the list, such as Can be added, In your account (with a Manage link), In another account, Reconnect or Connecting, so you can see at a glance what is already covered and what is left.
How the Connector Gets Installed Without a Download
The install path depends on which token you gave. With a cPanel token, mySites.guru uploads the connector zip through cPanel itself and unpacks it in the account. With a WHM token, it writes a one-time installer into the account that deletes itself first, expires after 5 minutes and uses a single-use secret, so the account is left clean. If an account has an old connector folder with no site behind it in mySites.guru, that folder is deleted and replaced with a fresh one with new keys.
Which Token: Root WHM, Reseller WHM or cPanel?
Create whichever token matches what you are responsible for. A root WHM token covers the whole server, a reseller token covers your accounts and no one else’s, and a cPanel token covers one account and nothing about the server it sits on.
| Token | What it sees | Port |
|---|---|---|
| Root WHM token | Every account on the server | 2087 |
| Reseller WHM token | Only that reseller's accounts | 2087 |
| cPanel token | One account, no server load, version or services | 2083 |
In WHM, the token lives under Development, then Manage API Tokens, then Generate Token. Name it mysites-guru, tick only the seven privileges below, enter 178.62.5.35 under Allowed IP Addresses, set an expiry if you want one, and Save. In cPanel it is Security, then Manage API Tokens, then Create: name it mysites-guru and set an expiry if you want one. The Connect dialog in mySites.guru shows the same steps while you do it.
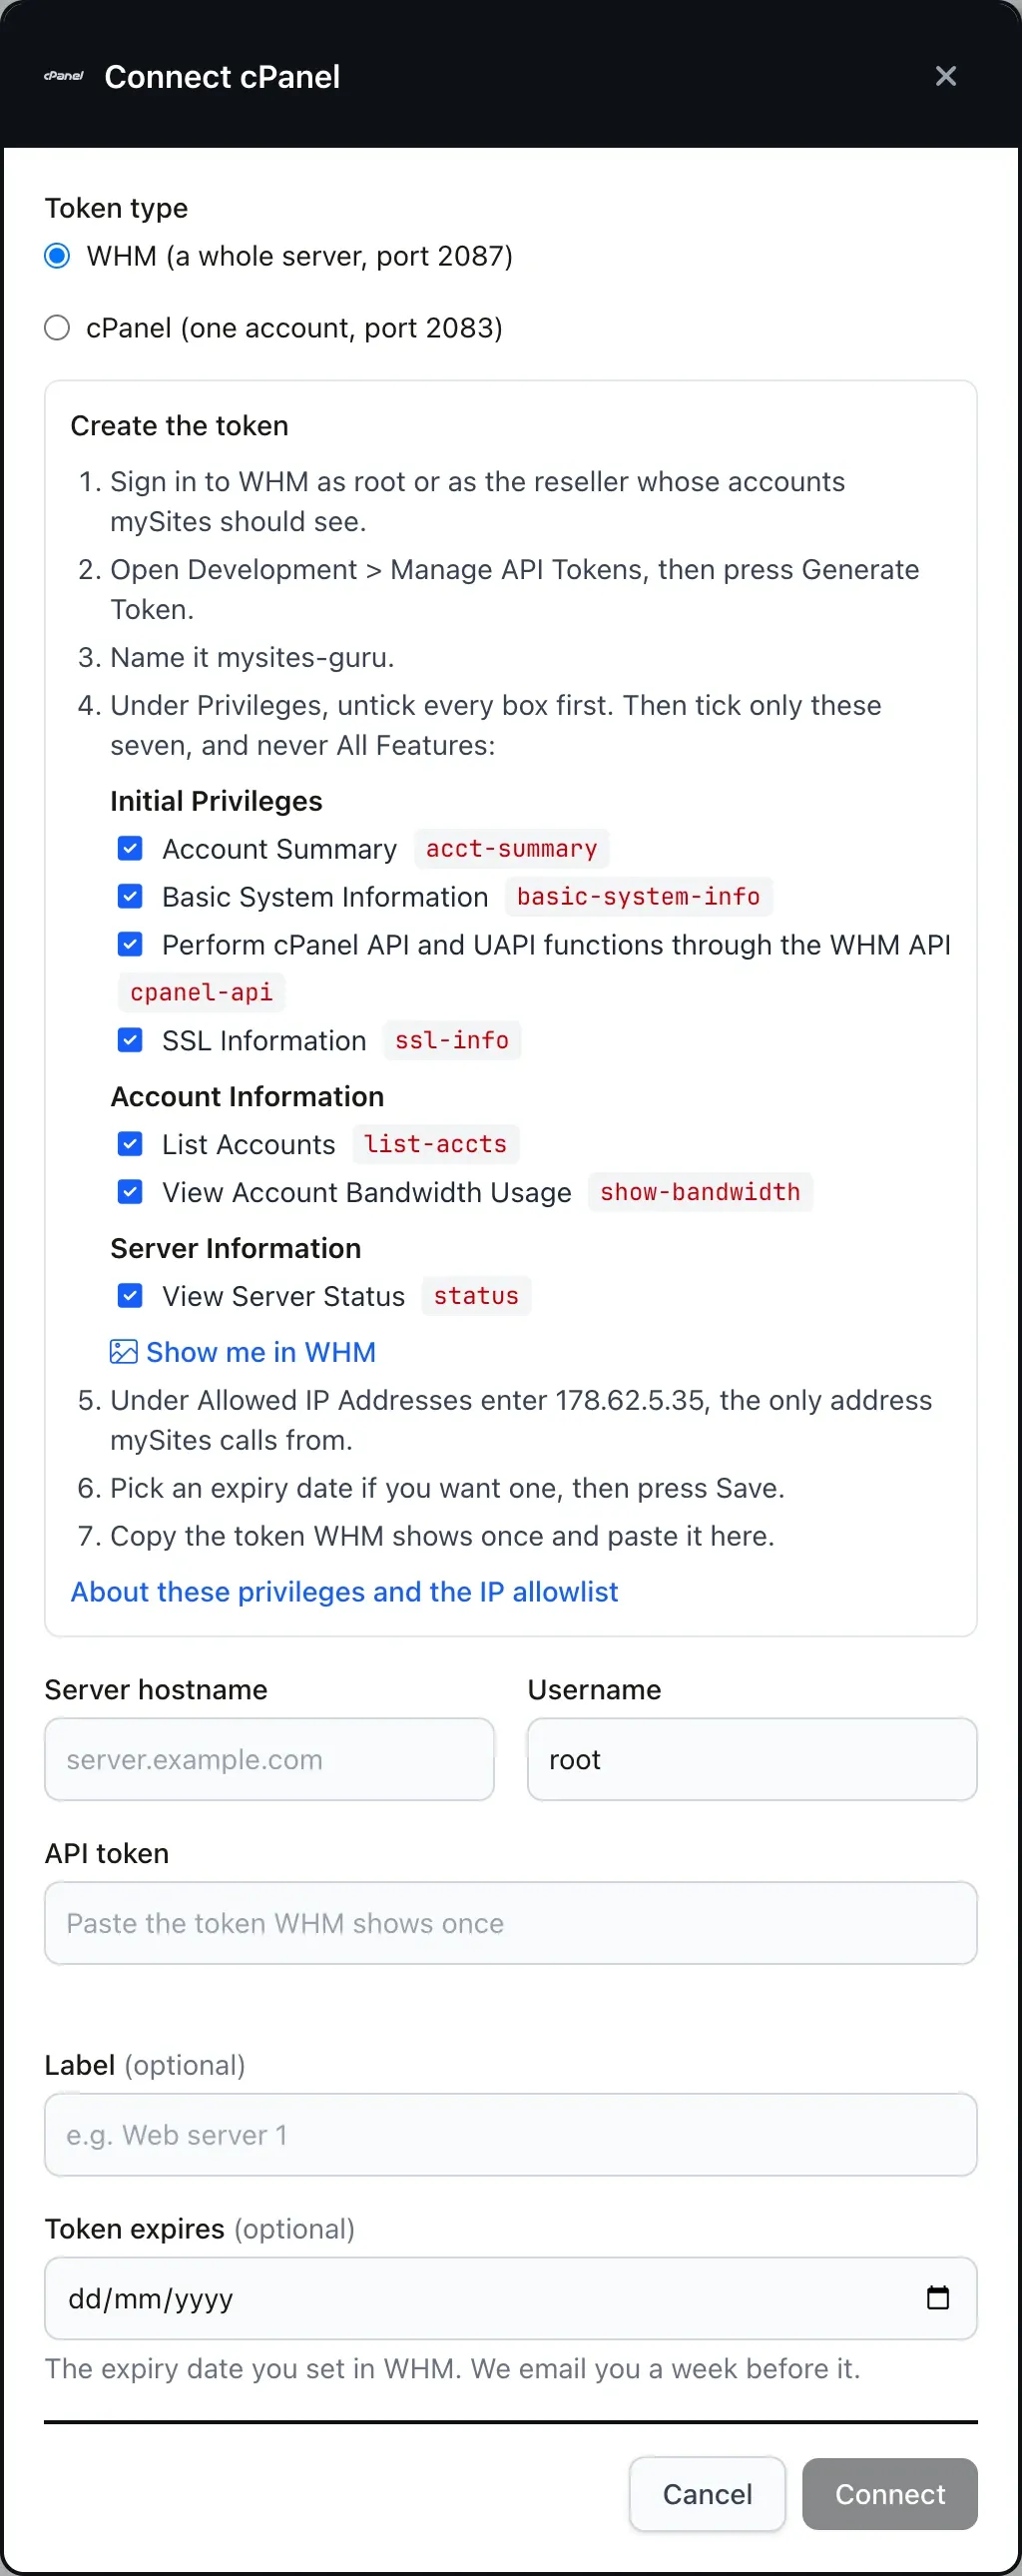
The seven WHM privileges are:
- Account Summary
- Basic System Information
- Perform cPanel API and UAPI functions through the WHM API
- SSL Information
- List Accounts
- View Account Bandwidth Usage
- View Server Status
Is This Secure?
Yes. Security is built into everything in mySites.guru, and your cPanel and WHM API tokens are handled the same way as every other secret we hold. Each token is encrypted before it is stored, so it sits encrypted at rest, and the key that decrypts it lives on different servers, in a different layer of the platform, from the database that holds it. A copy of our database alone gives no one your token. After you paste it in, only its last four characters are ever shown again, to you or to us.
Handing a third party your root password is the one thing no one in this business should do, and it is still the default when an agency or a contractor needs to get into a server. WHM already has scoped API tokens, and most people have not opened that page. A token with seven privileges, locked to one IP, is the right way to give any outside service access to a server, and mySites.guru is built to work inside that limit.
So mySites.guru turns down a token with All Features at connect. It does not ask for the create-user-session or manage-api-tokens privileges, does not sign in to cPanel or WHM as you, and does not make or change tokens. All calls come from 178.62.5.35, one call at a time per server. If a server answers with a “too busy” 503, mySites.guru leaves it alone for 10 minutes.
A rejected token stops all further calls to that server until the owner presses Test, so cPHulk sees one failed login rather than a lockout, and the owner gets one email. If the server has a self-signed certificate, the Connect dialog shows its SHA-256 fingerprint for you to check against WHM, and mySites.guru then trusts only that key, pausing if that key changes. It does not read the contents of configuration files.
Set the Allowed IP Addresses yourself
List Accounts on its own lets a WHM token read and change files, databases and cron on every account it can see. That is why the IP allowlist matters: with 178.62.5.35 as the only allowed address, a leaked token is useless from anywhere else. mySites.guru cannot set or check that allowlist for you, so set it when you create the token.
cPanel Controls Inside Manage Site
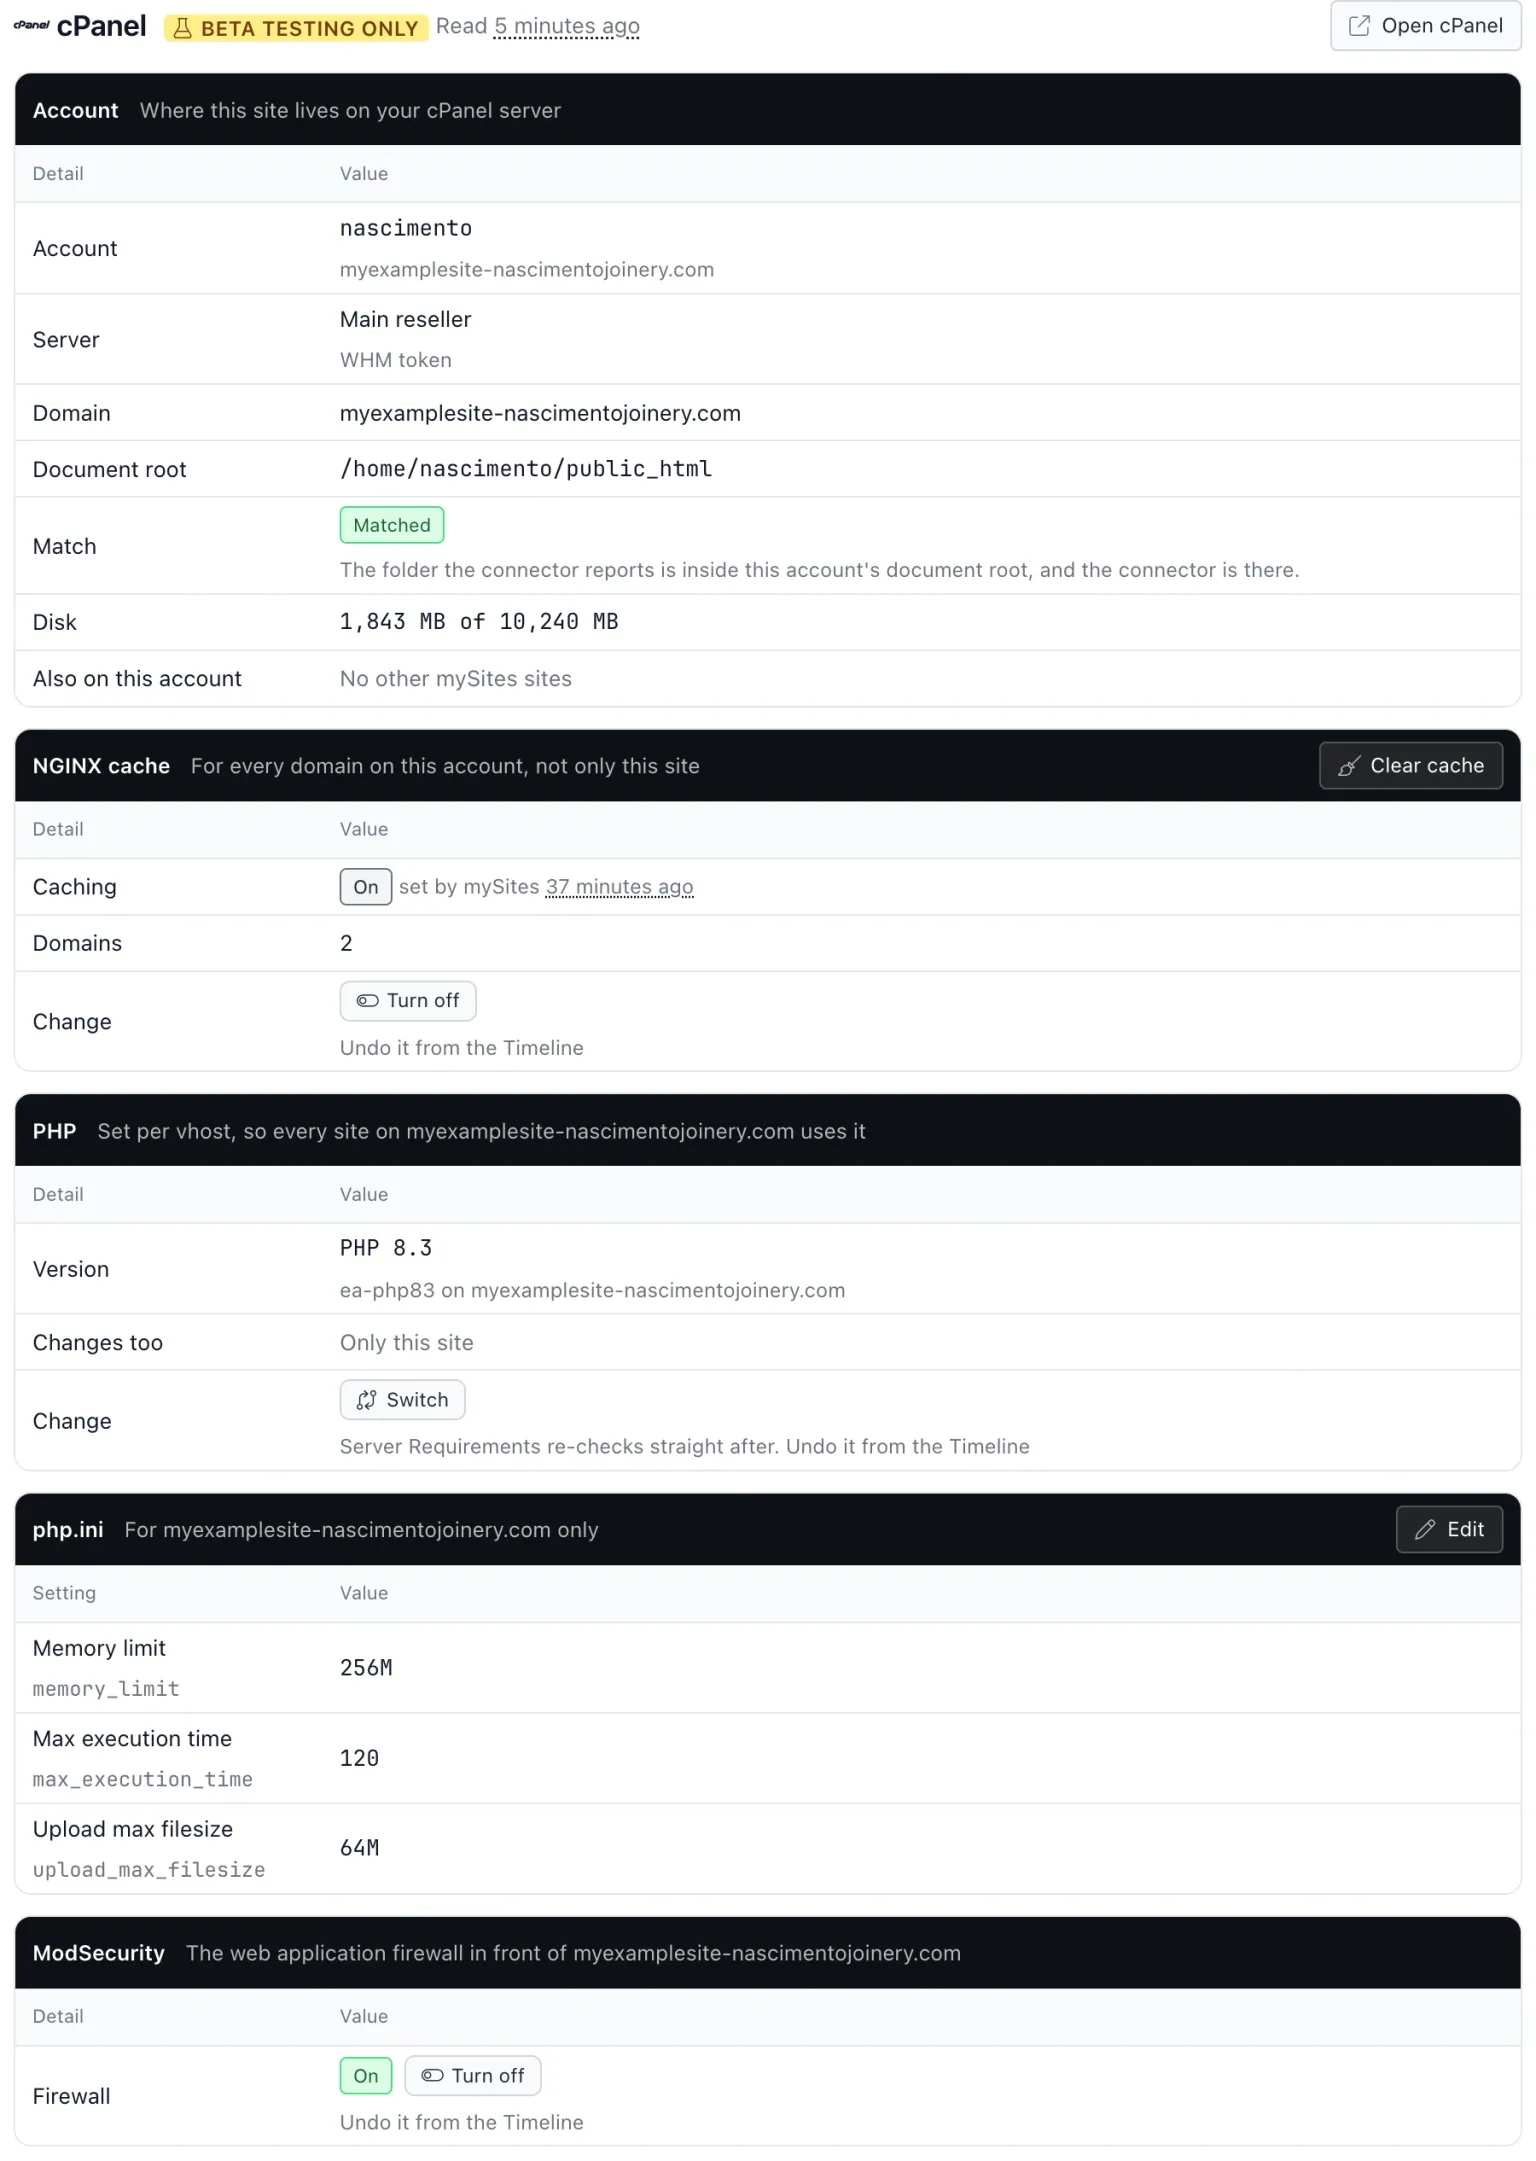
Once a site is linked to its cPanel account, Manage Site gets a cPanel tab. It opens on an Account card showing the Account, Server, Domain, Document root, Disk use, and a Match line that reads Matched, Likely or Unsure depending on how confident mySites.guru is that this account holds this site. Below it, “Also on this account” lists the other sites sharing the account, and an Open cPanel button takes you to the real thing when you need it.
Clear the NGINX Cache Without SSH
The NGINX cache card has a Clear cache button and a Turn off (or Turn on) button, under the heading note “For every domain on this account, not only this site”. It appears only for a site whose Match is Matched, and typing “Clear NGINX cache” into Cmd+K takes you straight to it. Clear cache empties the ea-nginx cache for the account, which then rebuilds on the next visit. Turn off and Turn on change caching for the whole account, and the confirm dialog lists every domain that will be affected before you agree.
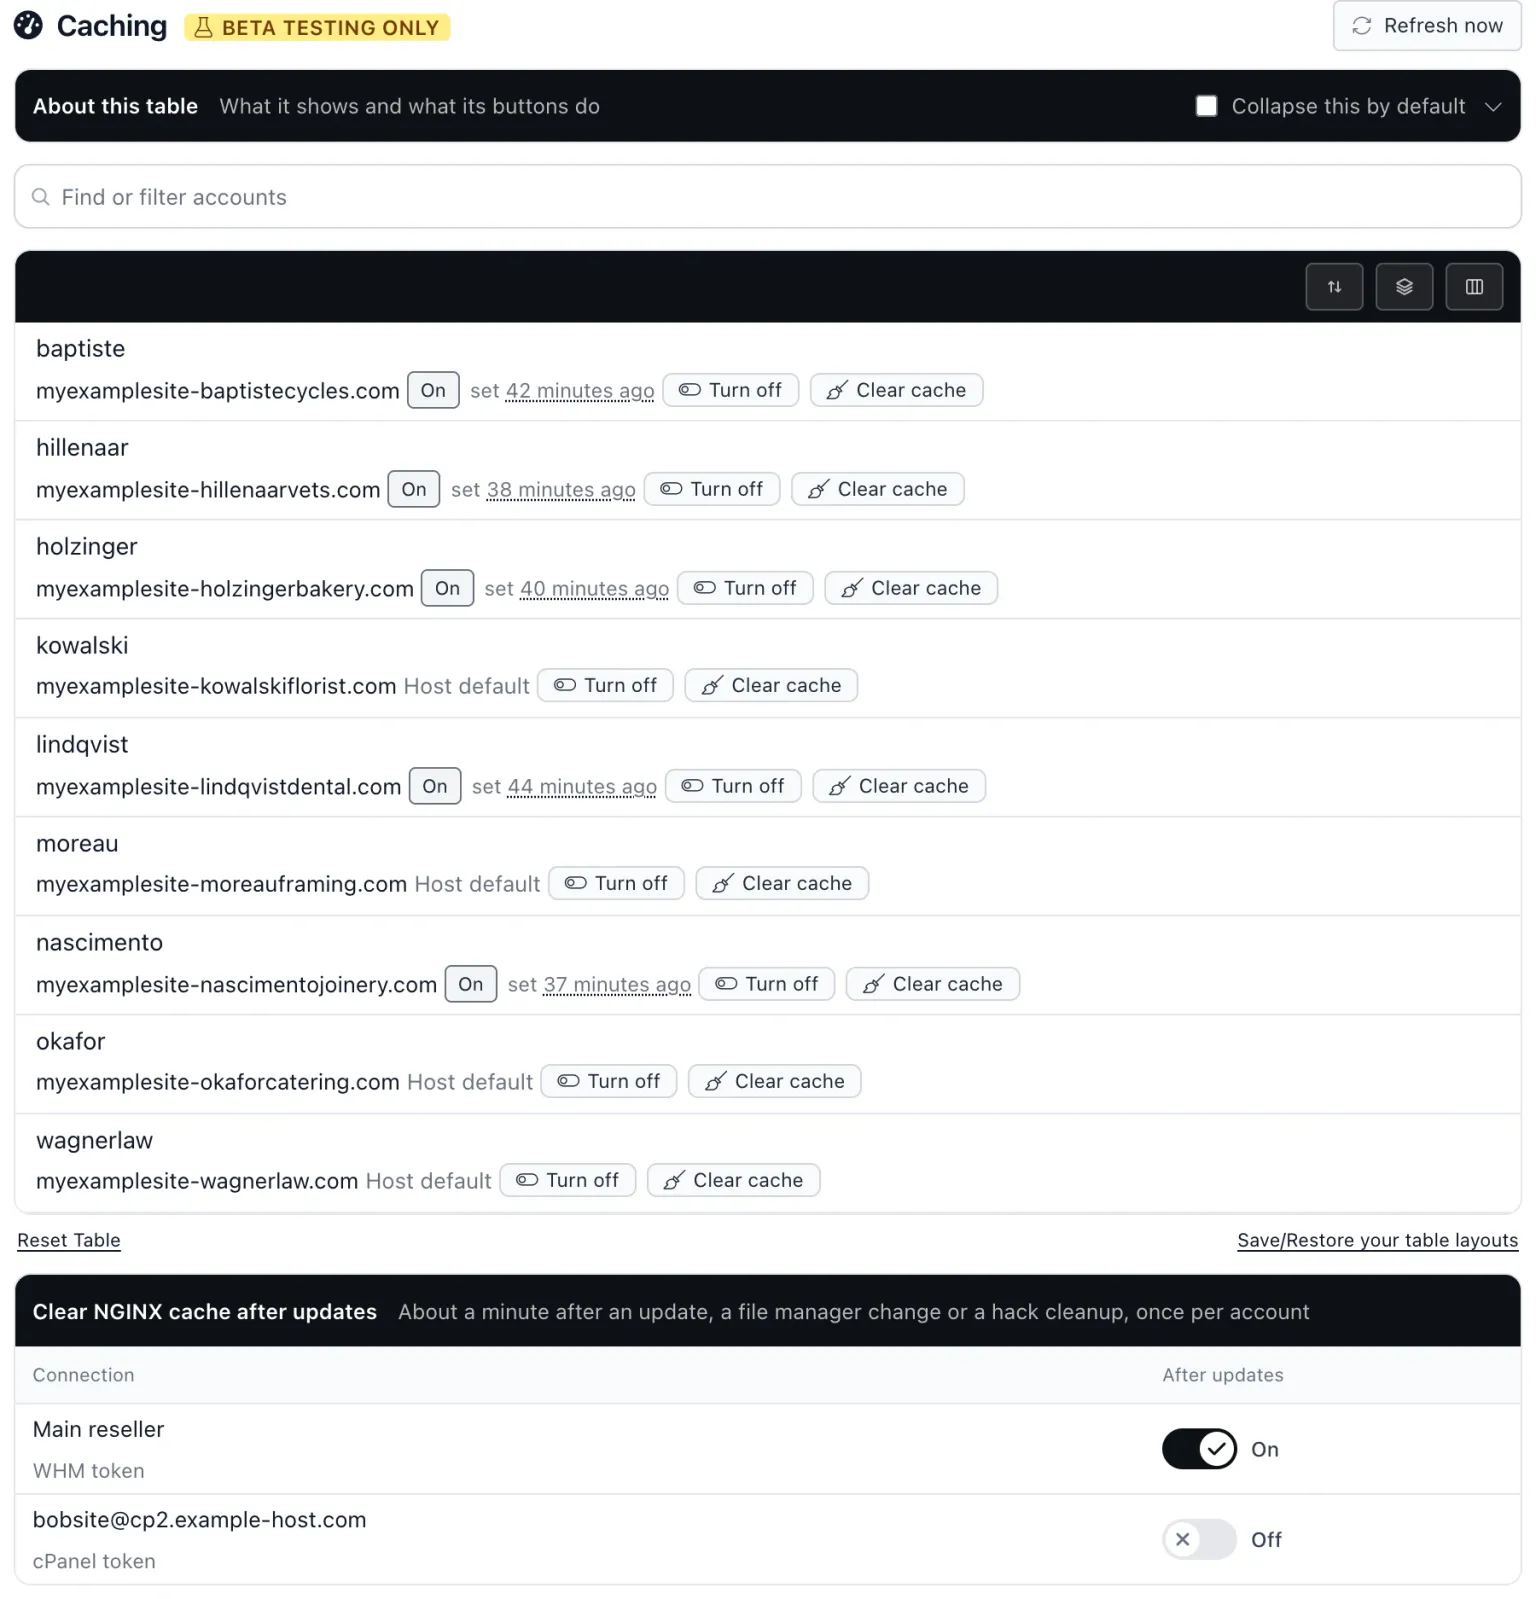
One limitation: a limited token cannot read ea-nginx’s caching state, so an account shows “Host default” until mySites.guru changes it. After the first Turn on or Turn off, the card shows the state it set.
The Caching pane of the cPanel hub shows all the accounts on your connected servers in one table, with its state (Host default, On or Off) and Turn on, Turn off and Clear cache for each. The same pane holds the switch that makes the cache clearing automatic: “Clear NGINX cache after updates”. With it on, about a minute after mySites.guru updates a site, changes a file through the file manager or cleans up a hack, the account’s cache is cleared once per run of changes. The switch is set per connection, and only the company owner can change it.
Switch PHP Version From the Site
The PHP card has a Switch button that offers only the versions the account has installed (the same limit as the PHP selector in cPanel), so you cannot pick one the host has not put there. The card warns that the change applies to all sites on that vhost, including ones that are not the site you are looking at. As soon as the switch is done, mySites.guru re-checks Server Requirements for the site, so you see straight away whether the new version suits it. If you are unsure which PHP version to pick, that post covers the supported branches.
Edit php.ini Limits
The php.ini card has an Edit button for three limits: Memory limit (32M to 4G), Max execution time (0 to 3600 seconds) and Upload max filesize (1M to 2G). Set them and press Save. No MultiPHP INI Editor, no FTP.
Backups, AutoSSL, ModSecurity and the Rest
The cPanel connection reaches further than the three cards.
- The Backups pane shows the host's own backup dates and any full backups sitting in the account's home folder.
- "Back up with cPanel before core upgrades" takes a cPanel backup before each core upgrade, the upgrade waits up to an hour for it, and the backup is skipped if it would take the account over 80% of its disk quota.
- Hosting Information gains a cPanel account layer with a Run AutoSSL button.
- The site's Backup page gets a "From cPanel" card alongside its existing backups.
- The ModSecurity firewall can be turned On or Off for the account, by the company owner only, which helps when a server-wide ModSecurity rule starts blocking saves.
- Every change made through cPanel can be undone from the Timeline.
- mySites.guru emails you when a token is rejected, a week before a token's typed expiry, and when an account's disk reaches 90%.
- The MCP server has cPanel tools too, so you can read an account, its cache and PHP, switch PHP, set php.ini and change caching from Claude Desktop.
What Will Discover Not Find?
Discover finds Joomla and WordPress, and nothing else. A Generic PHP app on the same account is not discovered, so for those you still use the connector zip. A host can also turn File Manager off for an account, in which case the row reads “File Manager is turned off for this account by your host.” and mySites.guru cannot install anything there.
Two more conditions. The site has to answer over HTTPS with a valid certificate before Connect will touch it, and Discover and Connect are for the company owner only.
Bonus: Connect a Joomla or WordPress Site With Just Its Admin Login
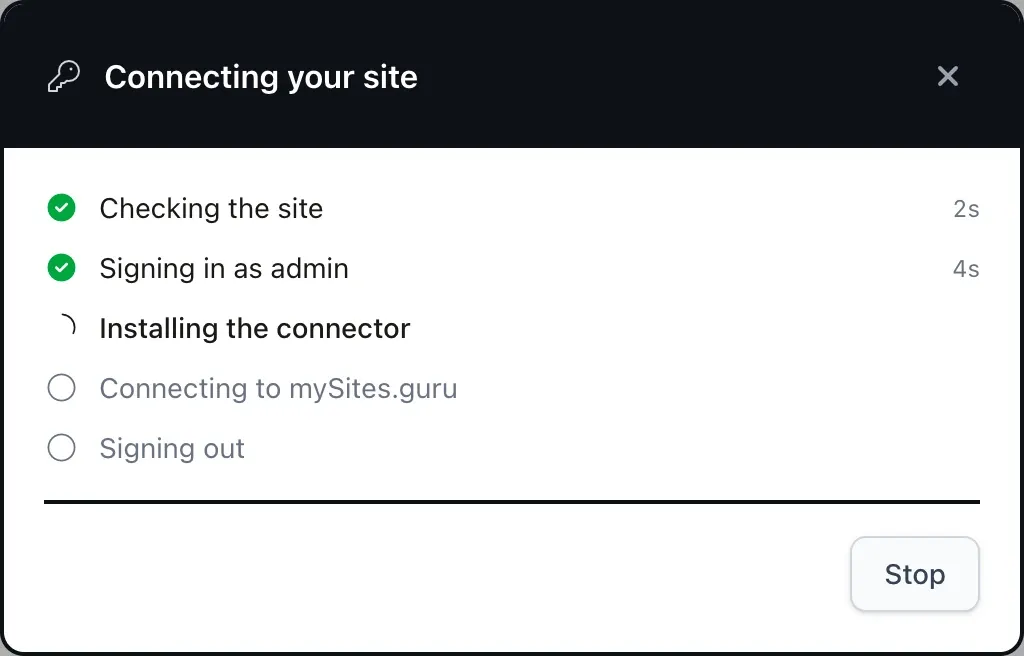
Not every site sits on a cPanel you can create a token for. For those, the Add Site page has a second strip under Other, “Auto connection using your credentials”, with a Connect for me button and a note underneath: “Used once, then deleted.” The dialog, titled Auto connection, asks for three things: “Site or admin login address”, “Admin username” and “Password”. Press Connect and watch it work through five steps on screen.
Checking the site.
Signing in as the user you gave.
Installing the connector, through the CMS's own installer, and activating it on WordPress.
Connecting to mySites.guru.
Signing out.
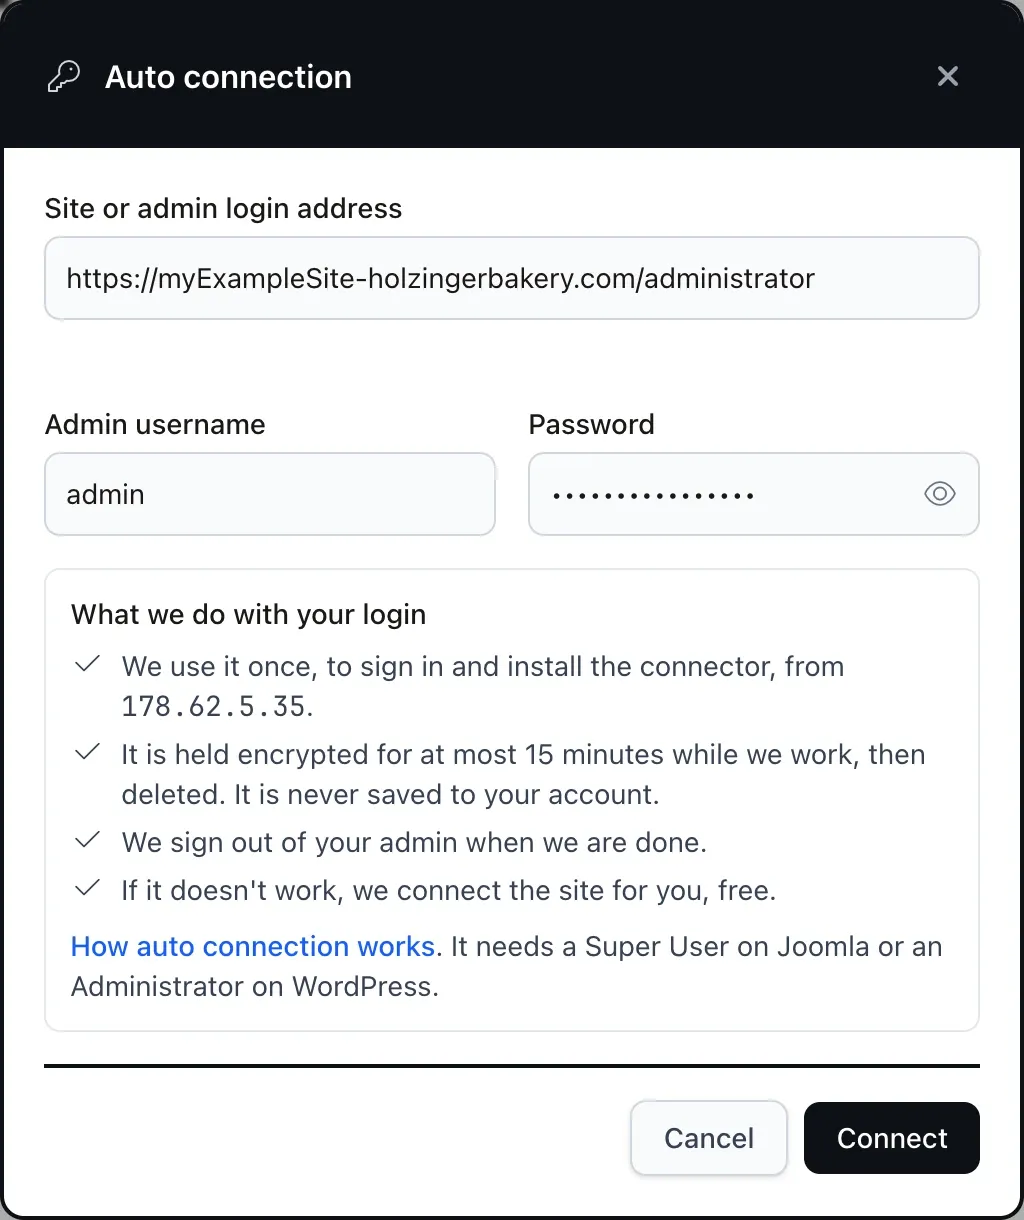
It supports a Joomla 4, 5 or 6 Super User and a WordPress Administrator. If the account has two-factor turned on, the dialog asks you for the code on screen and gives you 5 minutes and 3 tries. Authenticator apps, email codes, fixed codes, YubiKey, backup codes, and the Wordfence and Two Factor plugins on WordPress are all handled. The login is held encrypted for at most 15 minutes while it works, then deleted. It is never saved to your account.
The run is HTTPS only, and a redirect to another host stops it. Requests come from 178.62.5.35, signed with Web Bot Auth, so a host can tell who is knocking. When it succeeds, you see “Your first audit is running now.” A site already in your account keeps its history, and the Reconnect page has a Reconnect for me button that does the same job for a site that has lost its connection.
Some things it cannot get past: a captcha, passkeys, JavaScript-only two-factor, a firewall blocking us, a WordPress FTP credentials prompt, multisite, Joomla 3, a forced two-factor setup on first login, or a site that is already in another account. Each one stops the run with its reason and a link to the free send credentials form, where we take over by hand. There are caps too: 3 failed attempts per account in 24 hours, 2 per domain in 24 hours, and 10 starts per hour, and a Paused pill tells you when the cap lifts.
So the connector zip is now the fallback rather than the front door. Connect a WHM server or cPanel account once and every Joomla and WordPress site on it is a tick box away; for the rest, an admin login will do. Both start from the Add Site page, and a host who wants to know what to expect from us can read the information for web hosts.
Further Reading
- Guide to API authentication: API tokens in WHM - cPanel's own documentation for creating a WHM API token and restricting what it can do.
- How to clear the NGINX cache using ea-nginx - cPanel's support article for doing the same thing by hand, one server at a time.
- Is It Safe to Connect Client Sites to mySites.guru? - what the connector can and cannot do once it is on a site, and how the keys work.
- Add Unlimited Joomla and WordPress Sites to mySites.guru - the connect wizard and the connector zip, for sites not on a cPanel you control.
Frequently Asked Questions
Do I still need to download the connector zip?
Which WHM privileges does the token need?
Can mySites.guru read my database passwords through cPanel?
Does it work with a reseller account rather than root?
What happens if my token stops working?
Does auto connection keep my Super User password?
 Written and edited by a human, with AI assistance. Our approach to AI